September 28, 2015

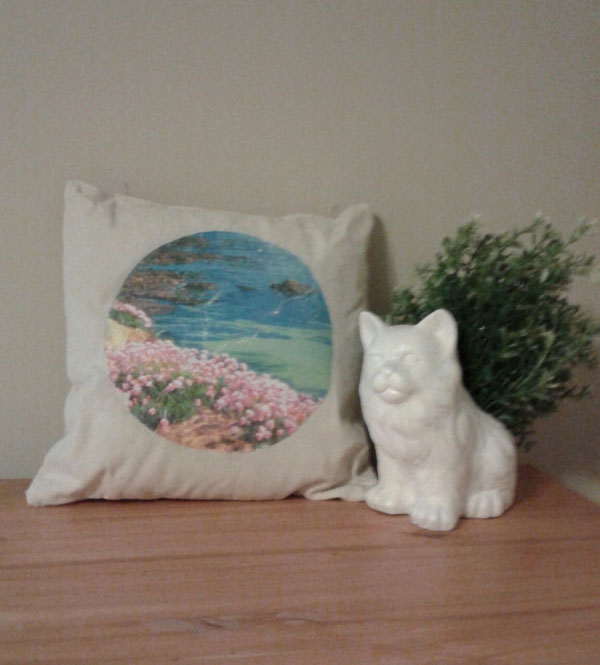
D.I.Y || Photo to Fabric Throw Pillow


|| What You Need ||

Blank Canvas Pillow or Pillow Case 
I got this mini pillow at Target for $3
Mod Podge Photo Transfer Medium
Foam Brush
Image
Spray Bottle with Water

1. With the foam brush you want to put a layer of the medium on the image making sure you cover it until you no longer see the image. Place the side with the medium on the canvas making sure to get rid of an excess from the sides and press firmly. I used an image from an old calendar I had, hence the numbers, but you want to make sure the image has the medium and is on top of the fabric.

2. Allow it to sit for 24 hours!! This is very important as to let it completely dry. When it's time spray the image lightly with the spray bottle and rub until the paper starts to peel. Be careful not to rub it in the same area because it'll start to peel away the image too.

Once you're done wipe and  voila!! A cute decorative pillow.  

Also bonus: The pillow is suppose to be the gold glittery polka-dots but I just thought it'd look cute to use it as a reversible throw pillow :)

Wondering about that adorable cat planter? There is a simply DIY for it right here.

September 17, 2015

D.I.Y | Before and After Bambo Nightstand

My wonderful friends gave me this nightstand when I first moved out of my own and I had been meaning to paint it ever since but I had trouble figuring out what exactly I wanted.


Since my bed frame and lamp is already white I wanted something with color that would also go with my dark blue bedspread. As usual I Pinterested my heart out and finally decided on red.

I always check for mismatched paint and lucky for me they had a red paint very close to what I wanted. I only needed to purchase another sample paint color to have enough. I mixed the two together and though I was getting worried it looked more pinkish it did darken up some after drying.

There you have it! For less than $5 in paint and spraying the handles with metallic spray I already had I updated a free dresser. I say that's a win!


September 15, 2015

Let's Get Moving

I've moved a couple times in the last few years from going back to my home town to a new adventure into the mountain town of Boone. Back in April my dream job at a world famous bakery became available; I took my chances and put in my resume. I was hired as part of their pastry team and started working in May which meant I needed to move to Charlotte. Well after handling my old place and commuting from my parents I finally have an apartment in the city! Luckily I have a majority of my stuff already boxed in storage but I still have some essentials I need to repack so naturally I created an adorable list to help me out. Plus I made two printable versions that you can use for your moving day!

|| FREE STUFF ||


Hope this helps keep things organized and feel free to use the blank one for any addition items if you'd like to be more specific!

September 10, 2015

D.I.Y | Faux Chalkboard Planner

Since coming back on the blog scene I needed something to write down ideas and just keep my thoughts organized. As much as I want a real fancy planner that isn't in my budget so instead I let the crafter in me take over! It's real easily and cost less than a high end planner.

|| What You Need ||
Blank Front Planner 
Printed Inspirational Quote 
Stickers (Used as tabs)
Permanent White Pen  
Pencil
Mod Podge (optional)

1. You want to flip over the paper with the inspirational quote and rub the area where the words and images are with the pencil.

2. Lay the paper with the shaded back on top of the planner where you want the design to go. Then take the pencil and trace over the lettering. Be very careful not to move the paper around.

3. It will be faint but there should be an outline that you can trace over with the white permanent pen.
  
4. Allow to dry and feel free to do a layer of Mod Podge to include a little label at the bottom which I just printed from my computer.

5. For tabs just simply take the stickers and fold over the edge making sure it can be seen when shut. 

|| FREE STUFF ||

I wasn't sure what I wanted on the front of my planner so I did a few ideas that you're free to print for your own Faux Chalkboard Planner or other DIY projects!!

September 4, 2015

Tattoo Etiquette


I have a growing number of tattoos and have had many different experiences with people talking to me about them. Here are just a few common courtesies or a "what not to do" list when it comes to approaching people about their tattoos.

|| Touching ||
DO NOT TOUCH! I repeat...DO NOT TOUCH! Even if they are simply on the arm please resist the urge to walk up and touch it. Also don't adjust an article of clothing to see it better. Yes, I have had a customer when I use to waitress see a little bit of my tattoo sticking out from under my sleeve and without my permission pushed my shirt sleeve up to see the rest. It was very rude and out of line to do so without my permission.

|| Meanings ||
I get asked this plenty of times and though I don't mind answering this question do not expect there to be a meaning behind it. There is nothing wrong with asking the question but we've heard it a million times and not everyone has a story to tell. To some people it's just an expression of art to some it's a memory and both are fine. So please don't give me a look of shame because I don't have an inspiring story as to why I have a cat tattoo on my ankle...I just wanted a cat tattoo on my ankle. 

|| But When You're Old ||
The whole,"What are you going to think about these when you're old?" question is well...old. When that time comes I would imagine I'd have other things to worry about besides my tattoos. Plus if you really want to know I think I'll look bad ass, wrinkly, but bad ass!

|| Pain Tolerance || 
I get asked a lot, "Did it hurt? Do you think if I get it [insert area] it'll hurt?" and honestly I can't give a straight answer. For me it didn't hurt too bad but I can't speak for everyone. It depends on how well you can tolerate pain plus where you get it. I have both of my feet tattooed which is said to be one of the most painful spots and despite the outline it felt no different from getting my arm tattooed. So you can't go off someone elses tattoo experience for your own pain tolerance.

|| Price ||
Asking about the price of someone's tattoo can be a little tricky because it's based on the artist and their rates. I personally wouldn't ask someone else how much their tattoo cost them so I would hope others would do the same. However you get what you pay for which means there is no such thing as a "great deal" when it comes to tattoos. 

|| Staring ||
For the most part my tattoos are covered up but when I wear certain dresses or shoes they are visible. Though I expect people to look at my tattoos doesn't mean I want someone to stand there and just lock eyes with my thighs (hehe it rhymes) Anyway if you like them feel free to nicely introduce yourself and tell me they're awesome or something of that nature and then kindly excuse yourself to go about your day.

|| Pictures ||
If I don't know you or just met you please don't ask to take a picture of my tattoo. It's kind of awkward to be honest...no wait...it is awkward. I'm glad you really liked my tattoo and want something similar but you can find something like it online just as quickly. Also while on that subject: do not send the artist a picture of a tattoo to copy-cat. It's fine to show them an idea of what you want or better yet a flash of the tattoo you want but leave it up to them to design something for you. Believe me it will be more meaningful that you have a unique piece rather than an almost exact replica of someone's unique piece. 

|| Work ||
That old question of, "how will you get a job with those tattoos?"is rather rude. Everyone has different career paths and though it's important to consider your tattoo placement it isn't up to you to determine if another person is going into a career where tattoos aren't allowed. So best thing to do is not ask.
  
Just be considerate and approach them like you would anyone else. People like hearing compliments on their tattoos and appreciate the feedback when it's done right. So remember these few rules and you'll be part of the Cool Non-Tattooed People Club in no time!


September 1, 2015

D.I.Y | Antique Jar

My mother has this neat antique looking jar sitting on a vanity that she keeps hair ties and pins. She got it long ago and I wanted to create something similar for myself!


|| What You Need ||

Small jar 
Metallic Finish Spray Paint
Printed Antique Style Image
Mod Podge
Foam Brush

  1. Find an image! I used one of an old map of Paris that I found at Remodelaholic for mine.
  2. Use the lid to trace around the image you want on top of the jar. Trim the edges until you get it to fit the smaller inner circle.
  3. Spray the lid with the metallic paint and allow to dry.
  4. To attach the image use the foam brush to apply Mod Podge then place image on top and apply another layer of Mod Podge of the image. 
  5. Once it dries you're ready to use it for anything. Store hair ties or use it for homemade scrubs!

LinkWithin

Related Posts Plugin for WordPress, Blogger...